Monday, June 28, 2010

Clone


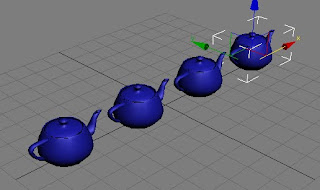
The simplest way to make a clone is to use Edit -- Clone command. This method creates a clone in the same place as the original object..To see the clone , move it away from the original..


You can create  multiple clones if you hold down the Shift Key before transforming an object.Now we can enter the number of copies. And each one is transformed incrementally  from the original object.

Quote of the Day , The only way to get rid of a temptation is to yield to it.


Friday, June 25, 2010

Tip of the day


If you use splines to create shapes, try to use a very small number of vertexes.


If you convert the vertexes in smooth/bezier/bezier-corner you can create very organic and round shapes without a too high number of vertexes .

Thursday, June 24, 2010

Adjusting Curvature in Splines

Hello Friends, Today My post is about the four vertex types of spline that allows you to control the curvature of a spline in Max.
Curvature controls are a property of vertices that control the curvature of neighboring segments. Because segments can not bend more than 2 degrees between steps. You can adjust the curvature of segments by moving vertices, moving vertex controls or converting to different vertex types:_

Corner Types produce straight line segments that protude at any angle on either side of the vertex.(Hard Corner)


Smooth Types produce gradually sloping  curves and have no control that you can adjust.(Smooth curve)


Bezier Types have two control handles that can be dragged to affect each adjacent segment.The exception is endpoints which have only one handle that can be dragged.(Beizer handle locked as straight lines)


Bezier Corner Types have two control handles that can be dragged independently, or one if the vertex is an end point. Use this type to create sharp corners and curved segments.(Vertex handles can be adjusted independently)


Quote of the day,
“Whenever you're in conflict with someone, there is one factor that can make the difference between damaging your relationship and deepening it. That factor is attitude.

Monday, June 21, 2010

Subobjects of Spline


So Shapes are the splines which can be used to create geometric shapes for architecture,  create low polygon models for 3d games  & motion path for animation.

Shapes are made up of three subobject components:

Vertices—which are point locations in space.


Segments- Segments are straight or curved lines.


Splines—Splines are made from a sequence of vertices that are connected by segments.


After creating a shape its parameters  can be modified for its editing but these are limited and we can convert all the shapes into editable splines. So that we can edit the individual subobjects with in the spline . 

Quote of the day;-
People will forget what you said, and people will forget what you did, but people will never forget how you made them feel.

Saturday, June 19, 2010

Extended Splines


In Max there are some splines called Extended Shapes which are useful to architects like:- WRectangle, Channel, Angle, Tee & Wide Flange.

To choose them just select CreateShapes- Extended Splines
Thought for the day; It is easy to love the people far away. It is not always easy to
love those close to us. It is easier to give a cup of rice to relieve
hunger than to relieve the loneliness and pain of someone unloved
in our own home. Bring love into your home for this is where our
love for each other must start.

Friday, June 18, 2010

Shapes

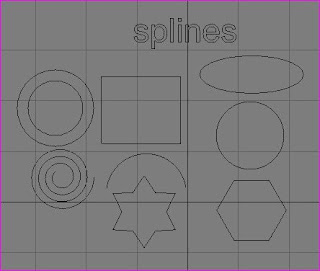
In Max Splines are used to create all sorts of shapes such as Circles, Ellipses & Rectangles or any other geometric  shapes for  architecture and motion path for animation.
So how can we create these splines, just choose CreateShape – Select any shape like Circle,Arc, Ngon,Text,  Rectangle, Donut, Ellipse, Star & Helix.
These shapes are non renderable by default. This means that when you render  an image  to an output file, spline shapes do not appear in the scene unless you set them to be renderable. Here are lots of spline modifiers which can be used to create 3d objects like Lathe, Extrude, Bevel, Loft etc.


Quote of the day:-
We ourselves feel that what we are doing is just a drop in the ocean. But the ocean would be less because of that missing drop.

Tuesday, June 15, 2010

Merge objects

Hello to all Max users
By merging you can bring objects into your current scenes from other scene files along with their materials & animation data. This allows you to develop parts of your scene in different files & then combine them into a single file.
For this you just have to Choose File --- Merge

Thought for the day
The most terrible poverty is loneliness and the feeling of being unloved.

Tuesday, June 8, 2010

To view an image file

To view an image file
The File menu offers a quick way to view image files including both still images & animations..What you have to do is just 
Choose FileView Image File
Navigate to the image or animation you want to view
Click View or open
The image file appears on your screen  & if it is an animation file, it opens in Windows Media Player or Quick Time Player..


Thought for the day
Keep your feet on the ground and your thoughts at lofty heights.

Friday, June 4, 2010

Group

Group : Grouping is a way of organising objects so that one object links to another & makes it possible to transform.
Nesting Group : Nesting group contains  other groups.
Ungroup :  It enables to break up a group & all the objects within the group revert to seperate objects but Nested groups stay intact.
Explode : It eliminates the group & the groups within the group & makes each object seperate.
Open & Close group :Open command enables you to access the objects within a group & close to reinstate.
Attach & Detach objects : It enables to insert or remove objects from an opened group without dissolving the group..